“They just don’t GET IT!” – everyone who ever talks to a programmer about their idea
Have you ever tried talking to a programmer about your idea and became frustrated when they didn’t seem to understand? Or even worse, they pretend they understand, but you can tell that they really don’t.
Why can’t they just UNDERSTAND you? Isn’t that their job?
Actually, no, it isn’t. Their job is to understand the technology. YOUR job is to get them to understand you. It might sound a bit unfair, but the upside if that if you learn to talk to programmers, you can save tens of thousands of dollars (not to mention hours of time and frustration) turning your vision into a reality. That’s easily worth the extra upfront work you’ll have to do.
Whether you are trying to launch your own website (or app) or working with a developer at your company, the best thing you can do is bridge the gap between you is by creating a mockup (aka a wireframe) which details what you have in mind.
In fact I’m going to go ahead and tell you this: do NOT approach a developer without a mockup. To do so is wasting time – both yours and theirs.
For the rest of this article, we’re going to work towards making a mockup for a time-tracking app for freelancers. It’s simplistic, but you can build on it to create your own mockup.
Step 1 – decide on a tool
There are dozens of tools you can use to create your mockups: Microsoft Visio, Adobe Photoshop, Google Doc Drawings, wireframe.cc, Balsamiq Mockups, etc. The important thing to note is: you should decide on a tool that is very quick for you to use, and easy for people to understand. Make sure you can draw something that looks kinda like what you’re trying to make, and that you can add text to explain things that the pictures don’t explain.
Personally I use a blend of tools. My early concepts are always in pen on paper. I like to sketch a bunch of different concepts before I go electronic. When I’ve chosen the concept I’d like to specify, I usually use Balsamiq Mockups.
Step 2 – write down your user tasks
To organize your time and make sure your mockup covers as much as possible, you should write down each type of user and the specific tasks they’ll be able to accomplish on your website.
For our time-tracking app, there are only two basic tasks our user will need to do:
- record time worked
- view time worked
It’s pretty simplistic, but it’s really just a quick checklist to ensure that your mockup is covering all your bases.
Step 3 – make a mockup
This is the fun part – you get to be creative! The biggest advantage of using an electronic mockup tool is that you can quickly create, abandon, and change anything you like on your website in a matter of seconds. Here’s a mockup I whipped up in 30 minutes for our time tracking app:
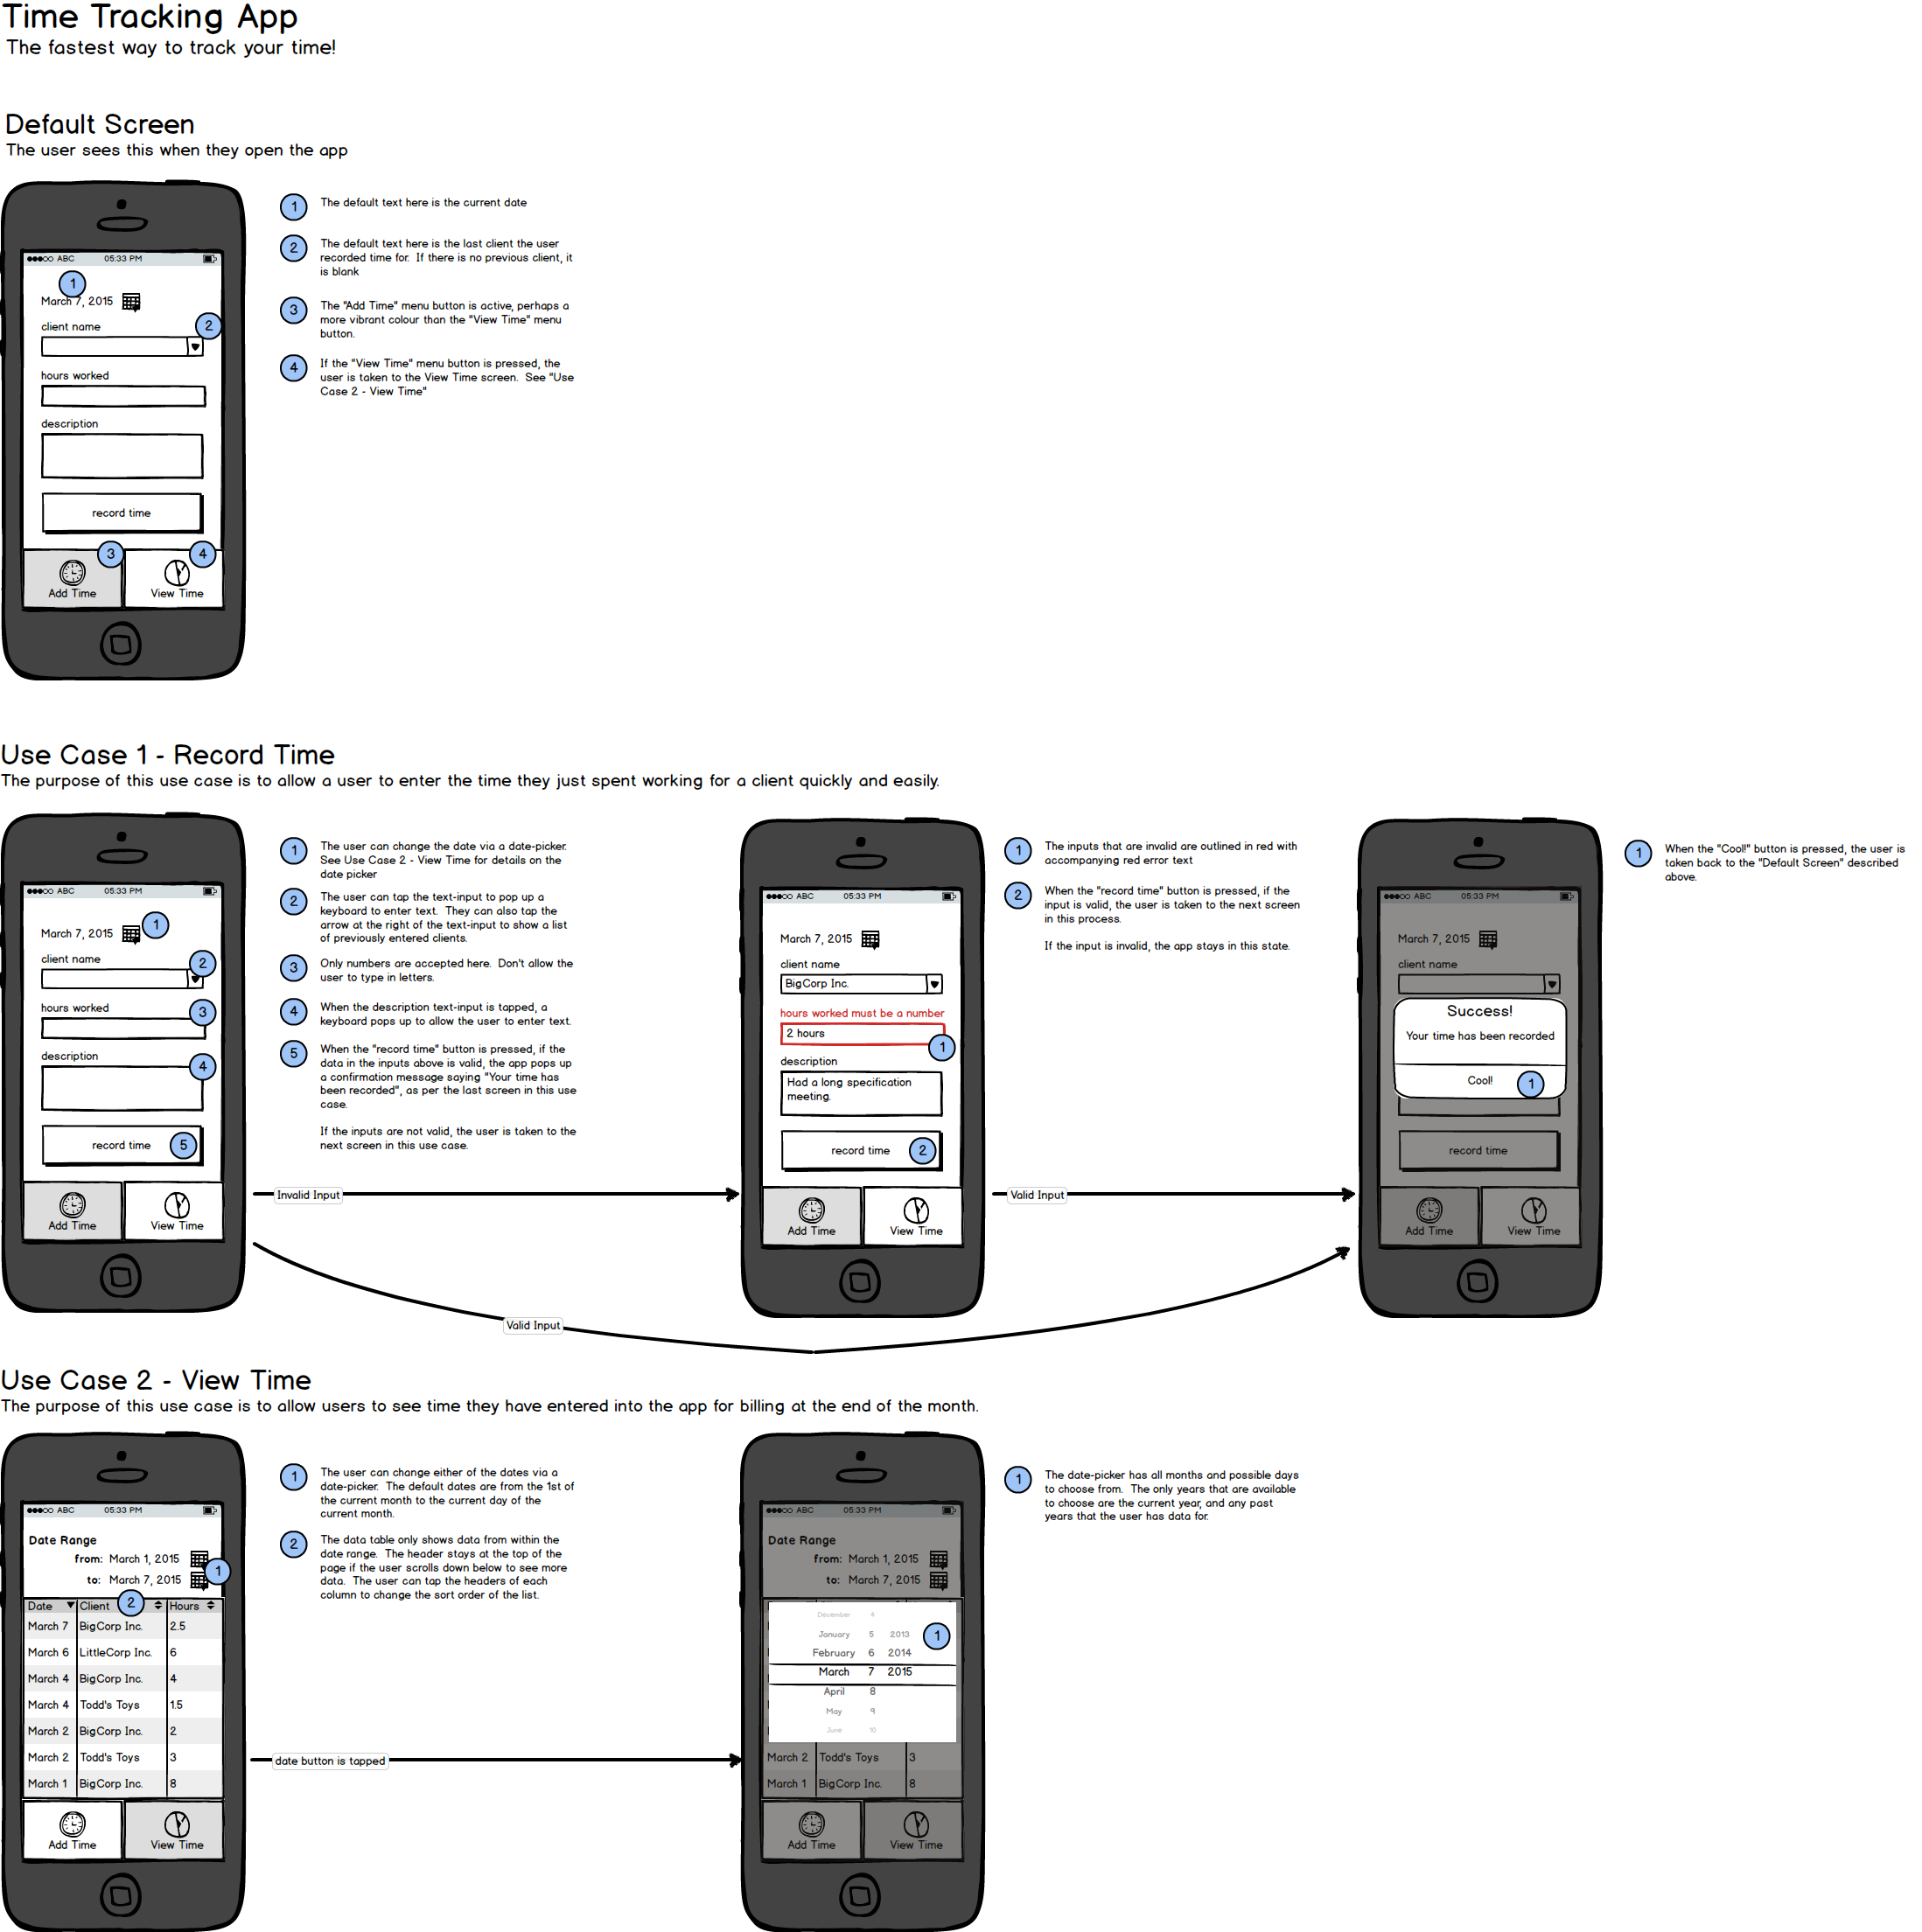
I like to create a picture of the “default” (what the user sees when they first open your app or web page) at the top. Then I have a row of interactions for each use case that we wrote down in Step 2.
Notice the numbers in blue circles peppered throughout the drawings. They aren’t part of the app – they are annotations. They provide additional information that the drawing itself doesn’t convey. In your annotation you may include things like default values, invalid values, app behaviours and other details.
Also notice that my mockup doesn’t look very pretty. That’s OK! The purpose of the mockup isn’t for the LOOKS, it’s for the FUNCTIONALITY.
Step 4 – show someone (not a programmer) your mockup
Inevitably, you will miss something. You are too close to the project, and something in your mockup is unclear or doesn’t make sense. The best way to catch these things is to show someone who hasn’t seen your project before. Here are some questions you should ask them:
- what do you think the purpose of this app is?
- who do you think this app is for?
- what are some of the things you can do in this app?
- anything you don’t understand?
- how can I make this better?
Talk very little, listen a lot. Your job here is not to explain the app, but to figure out why your mockup isn’t good enough to get the message across. At the end of the day, your mockup has to explain the app without your explanations, so the less you talk the better.
My wife is my guinea pig. I had her look at this app and asked her these questions. Here’s some of her feedback:
- “It looks like it’s for freelancers to record their time”
- “It took me a little while to understand what client name is supposed to mean”
- “I think it would be more clear if it said Who did you work for?”
- “It’s not obvious that record time is a button”
- “Where did the description go? I don’t see it in View Time”
Good feedback, wife! I spent another 10 minutes and updated my mockup to look like this:
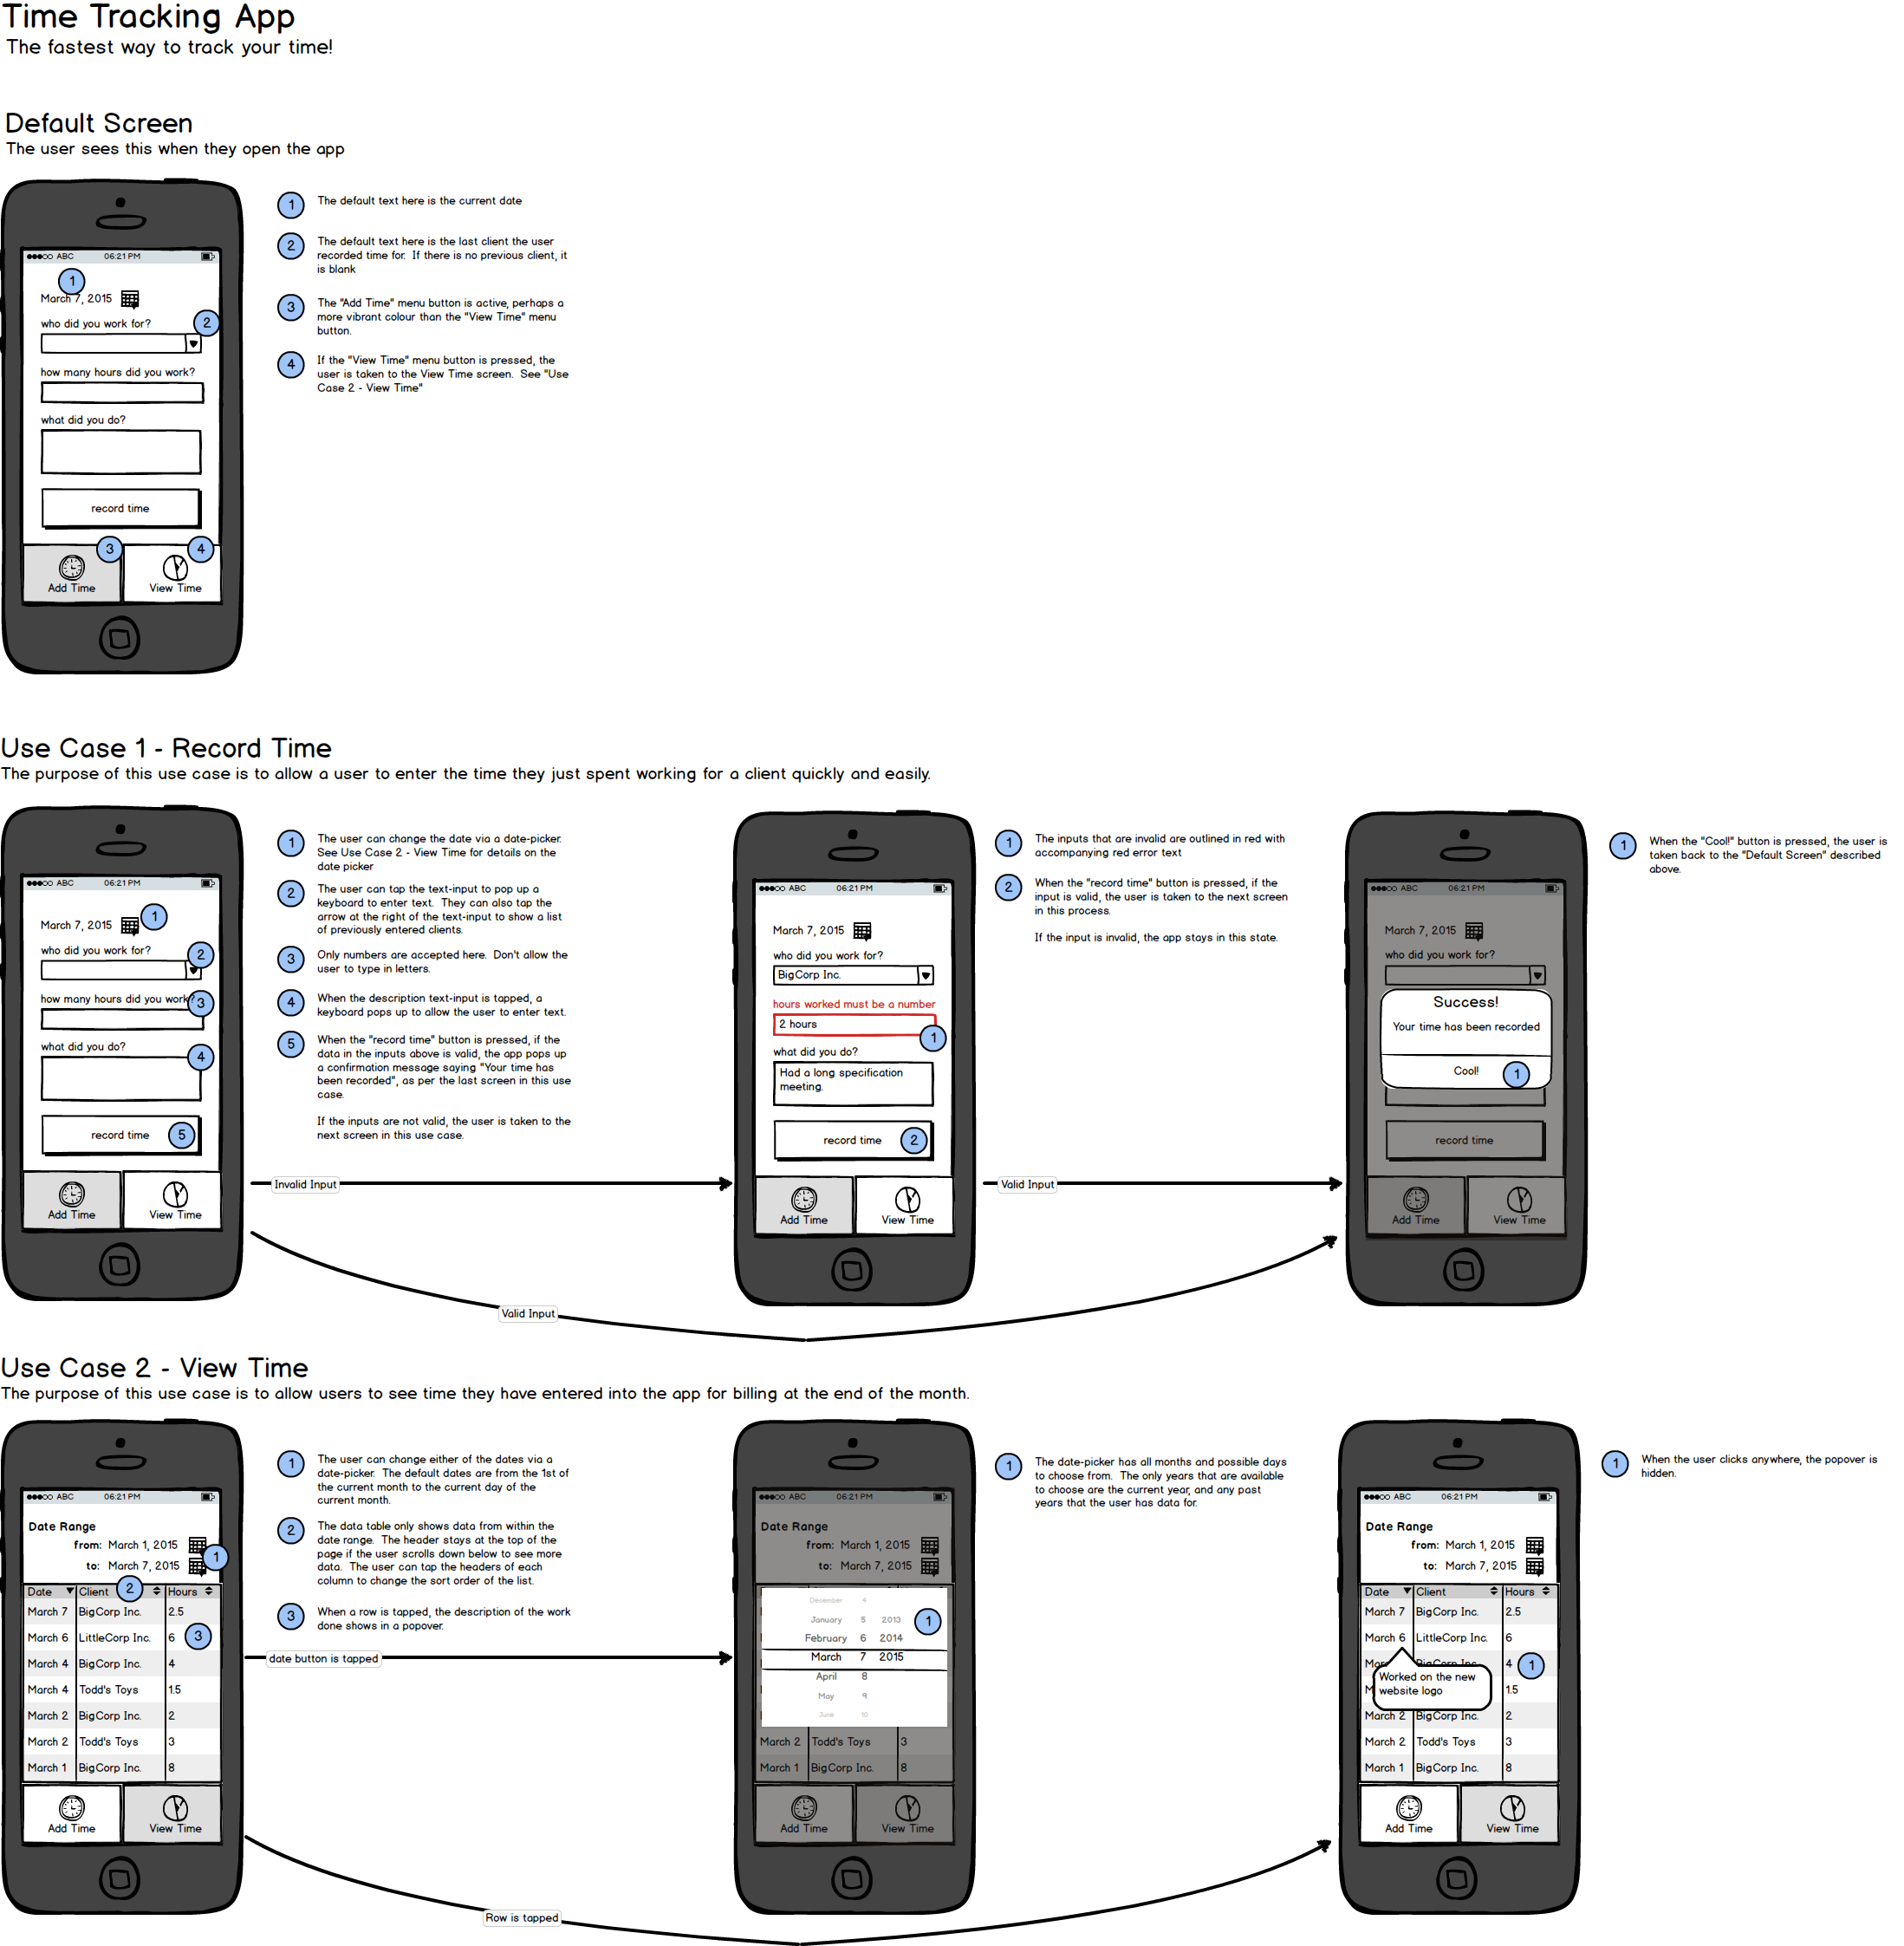
Notice that I didn’t take ALL of her feedback to heart (I left the record time button as it was). Even though you should listen to all the feedback, you don’t have to take all the feedback. In the case of the “record time” button, I’ll just keep it in my head and make sure that the designer makes sure it obviously looks like a button.
Step 5 – show a programmer
You have your mockup, it’s time to show a programmer. Here’s how you can tell if you’ve found a good one: if the programmer starts asking tons of questions and reveals that your mockup is missing a lot of details, they’re usually a decent programmer.
Don’t feel bad that your mockup is missing a lot of details (you can always add those into your mockup after the meeting). Instead you should be happy that your first meeting with a programmer is productive instead of frustrating. You’re starting the relationship on a good foot, and your mockup provides a point of communication between the two of you.
Conclusion
Programmers thrive on documentation, a mockup is the bare minimum that you should have. With a mockup, you can start vetting programmers based on how they react to your drawings and start settings timelines and expectations. If you were wondering where to start at the beginning of this article…CONGRATULATIONS! You’ve now started =)
General Tips for Mockups
- the mockup is also a great way validate your idea with your target market. Show people in your target your drawings and ask them the same questions in step 4 (you should probably remove the annotations before you show them, though)
- if you have an example of a UI element that you like from an existing app or website, then include a link to it in your annotation. (i.e. this date-picker should function similar to how AirBNB’s date picker works: http://link_to_date_picker)
- in general, try to keep your mockups as simple as possible. Too much information can be just as bad as too little. If your website has a LOT of functionality, consider breaking your mockups into multiple mockups based around functionality themes or releases
- close your eyes and imagine you’re using the app or website in the mockup. A lot of the mistakes and missing information in your mockup can be found this way.
Comments by ReddiComments - Join the conversation on Reddit!