time to read: 20 mins
time to implement: 30 mins
potential time savings: 30-45 mins a day
Email is a productivity tool, but if you use it wrong it can quickly turn into a time-vacuum. This is especially true for those who use email as a main point of contact – people like managers and freelancers. In this article, I’ll show you how to make the most of one of the best email tools on the market – Gmail. By following these tips, I was able to reduce my daily Gmail time from over 90 minutes/day to between 45 and 60 minutes/day.
Step 1 – Measure Your Usage
You’ll never know if this method works if you don’t quantify it. I use my browser (Chrome) for 95% of my Gmail usage, so I used a plugin called timeStats (https://chrome.google.com/webstore/detail/timestats/) to measure how long I spent in Gmail every day. I used the default Gmail for one week, then followed the changes in this article and used it for a week. timeStats will give you a nice line graph to show you how you’re improving.
Step 2 – Know the Workflow
Gmail has a TON of features, and everyone has a different way of using it. What a lot of people don’t think about is the fact that the designers of Gmail have a workflow in mind for people who use their system. If you use it the way it was designed to be used, things get a lot easier. In general, we’ll be following these standards (some should be obvious):
- Unread mail has not been read by you
- Read mail has been read by you
- Mail in your inbox requires your attention
- Mail that is Archived (aka not in your inbox) doesn’t require immediate attention
The biggest change to most people’s workflow is the liberal use of Gmail’s archive feature. Gmail’s designers WANT you to archive email, it’s why the archive button is so prominent everywhere:
So your workflow will look something like this: a new email comes in, and you make a decision whether to deal with it right away or whether to leave it for later. If you deal with it right away, you archive the email. If you want to deal with it later, you leave it in your inbox.
Step 3 – Strip Gmail Down to the Bones
Gmail has a ton of features – it actually has way too many. The first thing we’re going to do is strip it down to the basics, until you get used to the workflow. After you’ve seen some how it works, you can add features back in as you need them. Follow these steps:
-
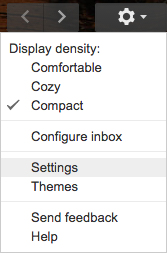
Open the settings screen by clicking the gear on the top right of your Gmail window and clicking “Settings”
-
Under the “General” tab, make the following changes:
- ensure your stars are set to “1 star”
- change “Personal level indicators” to “No indicators”
-
Go to the “Labels” tab and hide everything except “Starred” and “Sent Mail”
-
Under the “Inbox” tab, make the following changes:
- change “Inbox Type” to “Unread first”
- change “Inbox unread count” to “Unread items in the inbox”
- change “Importance markers” to “No markers”
-
If you use chat in Gmail, go to the “Labs” tab and enable “Right-side chat”
-
Scroll to the bottom of the window and click “Save Changes”
Step 4 – The Big Archive
Chances are, you weren’t using the archive button before you read this article, so we’re going to move everything that should be in archive into the archive. How do we do that? It depends on how you’re currently tracking mails that need your attention. In my experience there are two methods:
If you leave mail that needs your attention unread…
- Type “is:read in:inbox” in the search bar at the top of the page and click the search button

If you star mail that needs your attention…
-
Type “-is:starred is:inbox” in the search bar at the top of the page and click the search button

-
Select all by clicking the select box top left of all your emails

-
At the top of your list of emails, you’ll get a link that says “Select all conversations that match this search”. Click that link.

-
Click the archive button

The majority of your emails should now be archived – the only mail left in your Inbox should be the mail that needs your attention.
Step 5 – Reduce the Amount of Decisions You Need to Make
The real power of Gmail is unlocked in this step – you can set it up so that it makes decisions for you. The mental energy it takes to make a decision can slow you down. By letting Gmail handle this step, you’re going to turn into a power user, and you’ll save a ton of time.
How do we accomplish this? By making use of Gmails label functionality. Let’s start with a simple example.
-
Open an email from a sender that emails you regularly – let’s say a client.
-
Click on the label button to create a label for this type of email – I’m going to label it based on the project name:
-
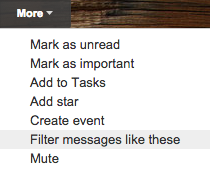
After you label the email, the label should show up in the sidebar to the left. Next click on the “More” button on the top right of your email and select “Filter messages like these”
-
When the filter screen opens, click “Create filter with this search »” at the bottom right corner.
-
The next screen will give you the actions that Gmail will take on your behalf when a message from this sender comes in. At the bare minimum, you’re going to want to apply the label that you just created. On top of that you MAY want to “Skip the Inbox” if it’s not something that will require your immediate attention. Don’t worry – even though you auto-archive a mail, it will still show up as unread, and the label on the left sidebar will show you unread emails for each project.

-
Finally, select “Also apply filter to matching conversations.” and then click “Create filter”.
The message are all applied to the label, which shows up on the left sidebar. If you’ve chosen to immediately archive these messages, they are OUT of your Inbox, no longer taking up your time or attention.
If you think about this for a moment, you realize how powerful it can be. If you set up labels for each “stream of work” and have Gmail automatically filter them for you, you spend much less time thinking about what to do for each email – the decision is made in advance. I can also see, at a glance, where my emails are piling up without spending any mental energy.
I create a label for every project, and then I have labels for receipts, bills, subscriptions and social notifications. When I start working on a project, I click on the label on the left sidebar, and only emails for that project are shown to me. This usually gives me an instant TODO list.
Another benefit: since I immediately archive subscriptions and social notifications, and so I’m never sidetracked when someone adds me on Twitter or sends me a message on Facebook. I can stay focused on the task at hand.
Note that this is very similar to what Gmail is trying to accomplish with the “Default” inbox, but you get much more fine-grained control when you use labels.
Step 6 – Enjoy Your Time
What do you like to do when you’re not struggling with email? I use the extra 30-45 minutes as contemplative time. One of my life goals is to enjoy my entire day – that 90 minutes I used to spend in Gmail was frustrating. Now that I’ve set it up probably, Gmail is an absolute pleasure to use.
Feedback?
What do you think? Do you have a method that works better? Let me know in the comments!